

What is the Square 1 Art project? Why is it so important?
Square 1 Art is a program that replicates student art on a variety of keepsakes to raise funds for the arts programming in our school. Last year, Verdugo Woodlands raised enough money to fund this year's entire Art Rep program! It engages students in creating art that they can share with others. It nurtures each student's creativity, provides them with a sense of pride, engages parents and children, creates long-lasting memories, and helps sustain visual arts in the school.
Every year, an art project is selected to help guide our students’ artmaking. This year, as we are focusing on Pop Art, we have chosen to do a lesson on Romero Britto.
You, the Art Reps, play a very important role in facilitating this program. You will provide help to students and your classroom teacher throughout this process. You will be the cheerleader, organizer, and administrator of the program in the class. In short, the success of the program in each class depends on your effort and dedication. So, in advance, we say thank you!
Not only is it a favorite project of our kids every year, it raises funds in the process. This is our single and most important fundraiser for the Arts at VW program and the money raised is earmarked specifically to go directly back to the arts curriculum. Our goal is 100% participation.
Every child gets a page of free stickers of his/her artwork, whether or not a purchase is made.

There are multiple products to choose from and order. Parents can ORDER great gifts of their child’s work to gift to their grandparents, family members and friends, delivered right in time for Christmas.

Our goal is to ensure 100% participation in every class. We also need to complete all the work by October 10th so that parents can place and receive their orders by Christmas. We will go over the details of the programs and schedules during orientation.
We sincerely thank you for your help and dedication!
Romero Britto: The Most licensed Artist in History

Hello everyone! This year we are going to explore Pop Art. Pop Art is art that uses imagery from popular and mass culture, like items from the grocery store, advertising, comic books, movies, and television. The imagery can be as mundane as a pencil or as recognized as your favorite superhero.
The first artist we are going to look at is an artist named Romero Britto. Britto’s art can be described as a vibrant mix of Pop Art, Graffiti Art, and Cubism infused with love and happiness.
Let’s start by watching a short video about him.
https://www.youtube.com/watch?v=YQO2l2nbftc
As we learned in the video, Britto’s work can be found all over the world and on almost every type of product you can buy. Today you are going to make your own Britto masterpiece. What’s extra fun about this project is that it is for our Square 1 Fundraiser so you can get your Britto artwork printed on a variety of products just like him. You will even get a sheet of stickers printed with your art on them for free!
Before we get started let’s take a quick look at what makes Britto’s art so distinctive. Look at the two pictures below and see what similarities you can find between them. What patterns do you see? What do you notice about the colors? What types of lines does Britto use?
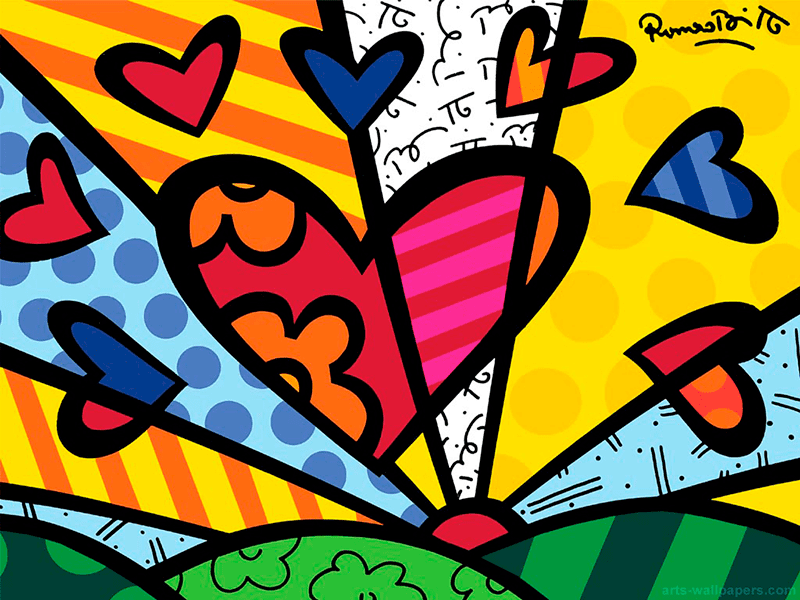

As you can see his work is identified by its bright colors, bold black lines, and fun, simple patterns. Think about these three things when creating your art. You can refer to this example pattern sheet at any time.

Ok let’s get started!!
The Project


Supply List:
· Square 1 art paper*
· Ruler
· Sharpie or thick black marker
· Crayons
· Colored markers
*You will be able to find your class’s Square 1 paper in a folder with your teacher’s name on it in the art closet. For the other supplies let your teacher know that the students will need crayons, markers, and a ruler. We will have extra supplies located in the art closet just in case.
For the younger grades you may want to pick up your Square 1 paper ahead of time and fill out the student information for the teacher.
Please remember for Square 1 the entire paper needs to be colored (no white space or borders!) and for students to write their names away from the edges because there is a possibility for them to be cut off if they are too close to an edge.
Grades TK-1st
You will be teaching this lesson as a directed draw. This means you will be drawing the picture along with the students on the overhead projector/screen.
1. Distribute Square 1 paper and supplies. Make sure every student’s paper is filled out correctly. For TK, K, and 1st We suggest using the sharpie/black marker for the drawing outline and crayons to color in the picture. Crayons are easier to use when coloring in large spaces.
2. The first thing you are going to have them draw is a large heart in the middle of their paper. Start by drawing half the heart, then the other half. We will also provide heart stencils that the students can trace for the younger grades. *For Tk you may want to pre draw the hearts for the students. Please ask your teacher what they believe would be best for their class.


3. Next you are going to have the students get their rulers ready and draw a line from about one inch down from the top left corner, going through the heart to the opposite side of the paper. The students may need help with this part. It is also possible to do this step free hand without the ruler.

4. Now draw a second line from about 2 inches down from the top corner on the right side of the paper, going through the heart to the opposite side of the paper.

5. Ok it’s now time to fill in the heart with different patterns. Pick a section to start in and have all the students touch that section with you so they know where they should be drawing their first pattern. For this first section have the students draw 5 small circles. Count with them as you and the draw the circles.

6. Again, have the students touch the next section of the heart with you. This time instruct the students to draw 10 dashes.

7. For the next section have the students draw 6 hot dog (horizontal) lines. Once again you should be drawing along with them to guide them.

8. In the final section of the heart. Have them draw 4 wavy lines. *for 1st grade you may choose to add patterns to 2 of the outer sections as well depending on how you feel it is going with your class. See example below.


9. Great! The outline is now finished and it’s time to color in your picture.
Start by picking a section to begin coloring. Again, have the students touch each section with you. For Tk and k lead them in which colors to use for each section. For Example, if you start with the polka dot section. Have all your students touch that section and then tell them we are going to color the dots green and around the dots blue. (You can decide what colors your students use for each section). For 1st grade the student can choose their own colors, but still lead them on which section they are coloring to ensure that the whole paper is colored. Repeat this step for all 8 sections of the drawing.


10. For the final step have the students write their name and school year on their drawing, for example Jo 22/23. Make sure that they do not write it too close to the edge.

11. When everyone is finished, please collect the papers, and place them in the designated basket in the art closet. The basket will have a sign that says completed Square 1 projects. Please also make note if there are any absences in your class and let us know. We want to ensure that every student has an opportunity to complete the Square 1 Project.
Grades 2-4
You will be teaching this lesson as a directed draw. This means you will be drawing the picture along with the students on the overhead projector/screen.
2. Distribute Square 1 paper and supplies. Make sure every student’s paper is filled out correctly. For grades 2-4 use the sharpie/black marker for the drawing outline and crayons or markers to color in the picture. Crayons are easier to use when coloring in large spaces. Markers will give you a more vibrant picture.
3. The first thing you are going to have them draw is a large heart in the middle of their paper with their sharpie or black marker. Start by drawing half the heart, then the other half.


4. Next you are going to have the students get their rulers ready and draw a line from about one inch down from the top left corner, going through the heart to the opposite side of the paper. The students may need help with this part. It is also possible to do this step free hand without the ruler.

5. Now draw a second line from about 2 inches down from the top corner on the right side of the paper, going through the heart to the opposite side of the paper.

6. Ok it’s now time to fill your picture in with different patterns. Pick a section to start in and have all the students touch that section with you so they know where they should be drawing their first pattern. Have the students refer to the sample pattern sheet and pick a pattern for this first section. Repeat this process for all 8 sections on the paper. Remember to draw along with your students. Let them know it is ok to repeat patterns. If they want 2 sections to have stripes and 3 to have polka dots. That’s totally ok. They are also free to make up their own patterns as well.


7. Great! The outline is now finished and it’s time to color in your picture.
Start by picking a section to begin coloring. Again, have the students touch each section with you. The students can choose their own colors, but you may still want to lead them on which section they are coloring to ensure that the whole paper is colored.


8. For the final step have the students write their name and the school year on their drawing. Make sure that they do not write it too close to the edge.

9. When everyone is finished, please collect the papers, and place them in the designated basket in the art closet. The basket will have a sign that says completed Square 1 projects. Please also make note if there are any absences in your class and let us know. We want to ensure that every student has an opportunity to complete the Square 1 Project.
Grades 5—6
You will be teaching this lesson as a directed draw. This means you will be drawing the picture along with the students on the overhead projector/screen.
1. Distribute Square 1 paper and supplies. Make sure every student’s paper is filled out correctly. For grades 5-6 use the sharpie/black marker for the and markers to color in the picture. Markers will give you a more vibrant picture.
2. The first thing you are going to have them draw is a large heart in the middle of their paper with their sharpie or black marker. Start by drawing half the heart, then the other half.

3. Then instruct the students to draw 2 small hearts on their paper. One near the top of the big heart and one near the bottom of the big heart. Make sure to let the students know not to draw the hearts too close to the edge of the paper.


4. Next you are going to have the students get their rulers ready and draw 3 lines one from the left side, one from the right side, and one from the top. The lines should go through the big heart, but not the small hearts to the opposite side of the paper, see below for an example.


5. Ok it’s now time to fill your picture in with different patterns. Have the students refer to the pattern sheet for this step. Instruct the students to fill in each section. Let them know it is okay to repeat patterns, leave some sections blank to be filled in with solid colors, and to make up their own patterns as well.


6. Great! The outline is now finished and it’s time to color in your picture. For 5-6 Grade simply instruct the students to color in their pictures any way they would like. Please emphasize that they do need to color in the entire picture and that bright colors work best.


7. For the final step have the students write their name and grade on their drawing. Make sure that they do not write it too close to the edge.

8. When everyone is finished, please collect the papers, and place them in the designated basket in the art closet. The basket will have a sign that says completed Square 1 projects. Please also make note if there are any absences in your class and let us know. We want to ensure that every student has an opportunity to complete the Square 1 Project.